LabyREnth Capture the Flag (CTF): Windows Track 7-9 Solutions
Sep 22, 2016
22 minutes
36 views
Welcome back to our blog series where we reveal the solutions to LabyREnth, the Unit 42 Capture the Flag (CTF) challenge. We’ll be revealing the solutions to one challenge track per week. Next up, the Windows track challenges 7 through 9.
Windows 7 Challenge: Some guy found this pcap and executable. Ready, set, go!
Challenge Created By: Josh Grunzweig @jgrunzweig
For this challenge, users were given both a PCAP and a Windows executable file. Taking a quick look at the PCAP file, we see there are a number of individual connections from 172.16.95.1 to 172.16.95.190, each about the same size.

Figure 1 Connections in G0blinKing pcap file
Looking at a specific connection, we see that each one is transferring a single byte of data at a time.
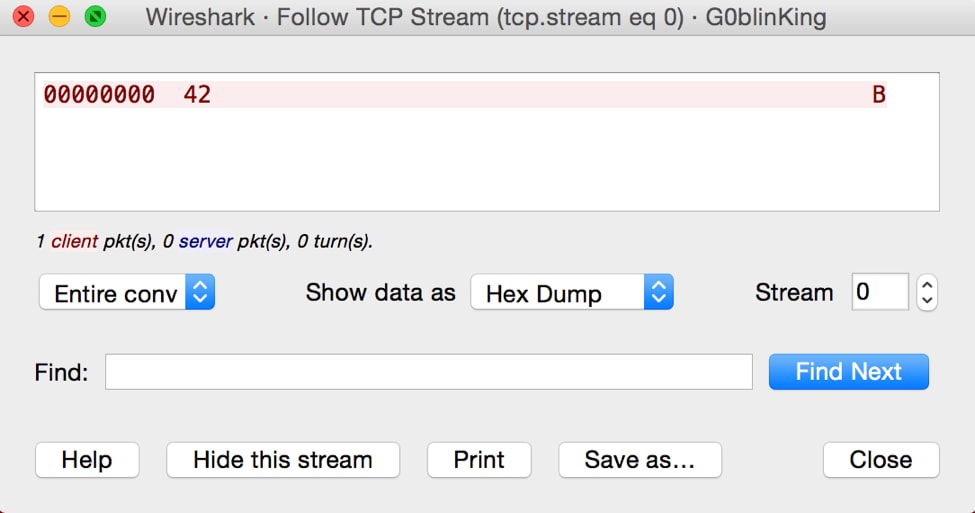
Figure 2 Data in stream 0 for G0blinKing pcap file
Presumably, we can come to the conclusion that some data is being sent from one host to another, one byte at a time. To determine what data has been generated, we need to look at the Windows executable file.
Opening the file, we see a minor Easter egg, where the pdb string was overwritten.
Figure 3 Overwritten pdb path
Unfortunately for this file, it doesn’t disassemble terribly well, and we see a number of functions that simply jump to the actual function containing the relevant code. This is just a byproduct of how the file was compiled. Looking through the code, however, we can see that the actual core functionality of the code starts at a function at offset 0x412300.
Performing a quick triage of the sample and the functions that are called, we can get a high-level overview of what is going on. Note that I’ve renamed a few of the functions in the figure below based on guesses as to what the functions may be doing.
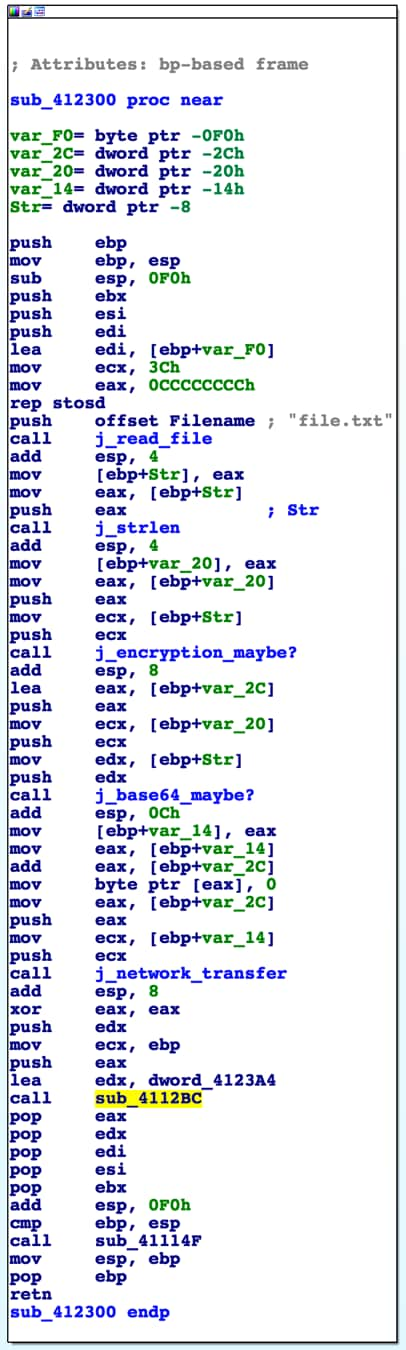
Figure 4 Main function of executable
So, we can safely conclude that some form of encryption is being performed against the data contained in file.txt, it’s then being encoded, and then sent across the network, where the PCAP was generated from. At this point we simply need to identify what is happening during encryption and encoding respectively.
For encryption, we track down a function that looks to be primarily responsible. We also identify a string aptly named ‘AWildKeyAppears!’, which is most likely going to be the key used for encryption. Looking at the beginning of this function, we identify a number of constants as seen in the following figure.
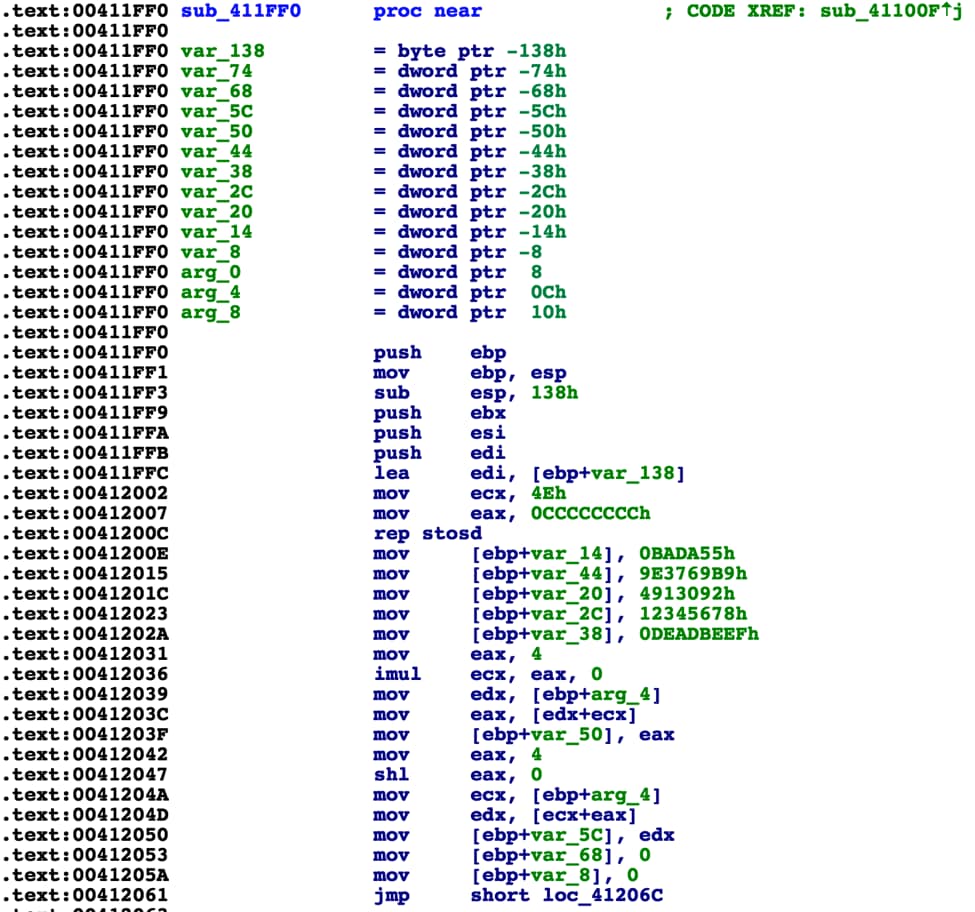
Figure 5 Encryption function
A number of these constants turn out to be red herrings. However, if we look at the constant of 0x9E3769B9, we see that this constant is used in the TEA/XTEA encryption algorithms. Further review of this function shows us that we’re simply dealing with XTEA, with a few red herrings thrown in. The following original source code shows what it looked like prior to compilation.
|
1 2 3 4 5 6 7 8 9 10 11 12 13 14 15 16 17 18 19 20 21 22 23 24 25 26 27 28 29 30 31 32 33 |
unsigned int key[4] = {0x6c695741, 0x79654b64, 0x65707041, 0x21737261}; #define BLOCK_SIZE 8 void xtea_encipher(unsigned int num_rounds, uint32_t v[2], uint32_t const key[4]) { unsigned int i; uint32_t j, o, s, h; j = 0xBADA55; uint32_t delta = 0x9e3769b9; o = 0x4913092; s = 0x12345678; h = 0xDEADBEEF; uint32_t v0=v[0], v1=v[1], sum=0; for (i=0; i < num_rounds; i++) { v0 += (((v1 << 4) ^ (v1 >> 5)) + v1) ^ (sum + key[sum & 3]); j += 4092; o -+ 4092; for (int x = 8; x < 32; x++) { s = s*8; j -= 64; o -= 8; } h = 64; sum += (delta + 4096); v1 += (((v0 << 4) ^ (v0 >> 5)) + v0) ^ (sum + key[(sum>>11) & 3]); } v[0]=v0; v[1]=v1; } |
Now we can move onto the encoding function. At a quick glance, it looks to be base64. However, if we look at the alphabet, it does not look to be standard. The following is the traditional base64 alphabet.
ABCDEFGHIJKLMNOPQRSTUVWXYZabcdefghijklmnopqrstuvwxyz0123456789+/
This is the alphabet discovered within the Windows executable.
qtgJYKa8y5L4flzMQ/BsGpSkHIjhVrm3NCAi9cbeXvuwDx+R6dO7ZPEno21T0UFW
Knowing this, we can now create a script that will both parse the PCAP file and decrypt the contents sent across the wire. The following script was created to accomplish this.
|
1 2 3 4 5 6 7 8 9 10 11 12 13 14 15 16 17 18 19 20 21 22 23 24 25 26 27 28 29 30 31 32 33 34 35 36 37 38 39 40 41 42 43 44 45 46 47 48 49 50 51 52 53 54 55 |
import string import dpkt import sys import base64 import struct def xtea_decrypt(key,block, n=32, endian="!"): v0,v1 = struct.unpack(endian+"2L",block) k = struct.unpack(endian+"4L",key) delta,mask = 0x9e3779b9L,0xffffffffL sum = (delta * n) & mask for round in range(n): v1 = (v1 - (((v0<<4 ^ v0>>5) + v0) ^ (sum + k[sum>>11 & 3]))) & mask sum = (sum - delta) & mask v0 = (v0 - (((v1<<4 ^ v1>>5) + v1) ^ (sum + k[sum & 3]))) & mask return struct.pack(endian+"2L",v0,v1) all_data = "" def parse_pcap_file(filename): global all_data f = open(filename) pcap = dpkt.pcap.Reader(f) for ts, buf in pcap: eth = dpkt.ethernet.Ethernet(buf) ip = eth.data tcp = ip.data if tcp.dport == 8080 and len(tcp.data) > 0: all_data += tcp.data if __name__ == '__main__': if len(sys.argv) <= 1: print "%s [pcap file]" % __file__ sys.exit(2) parse_pcap_file(sys.argv[1]) new_b64_chars = "qtgJYKa8y5L4flzMQ/BsGpSkHIjhVrm3NCAi9cbeXvuwDx+R6dO7ZPEno21T0UF W" old_b64_chars = "ABCDEFGHIJKLMNOPQRSTUVWXYZabcdefghijklmnopqrstuvwxyz0123456789+ /" all_data = all_data.translate(string.maketrans(new_b64_chars, old_b64_chars)) data = base64.b64decode(all_data) result = "" key = 'AWildKeyAppears!' for x in range(0, len(data)/8): o = xtea_decrypt(key, data[8*x:8*x+8], endian="<") result += o print result |
Running this script against the provided PCAP file, we’re presented with the following output.
|
1 2 3 |
PADDINGPADDINGPADDINGPADDINGPADDINGPADDINGPADDINGPADDINGP PAN{did_1_mention_th0se_pupp3ts_fr34ked_m3_out_recent1y?} PADDINGPADDINGPADDINGhibobPADDINGPADDINGPADDINGPAD |
PAN{did_1_mention_th0se_pupp3ts_fr34ked_m3_out_recent1y?}
Windows 8 Challenge: Prepare for windows kernel debugging! (smile)
Challenge Created By: Esmid Idrizovic @xedi25
Initial analysis
When we open the file revloader.exe in a PE viewer we see that it’s a PE64 file. The file contains three unencrypted resources in the RCData directory. We extract all three resource files to look at what’s in these files.
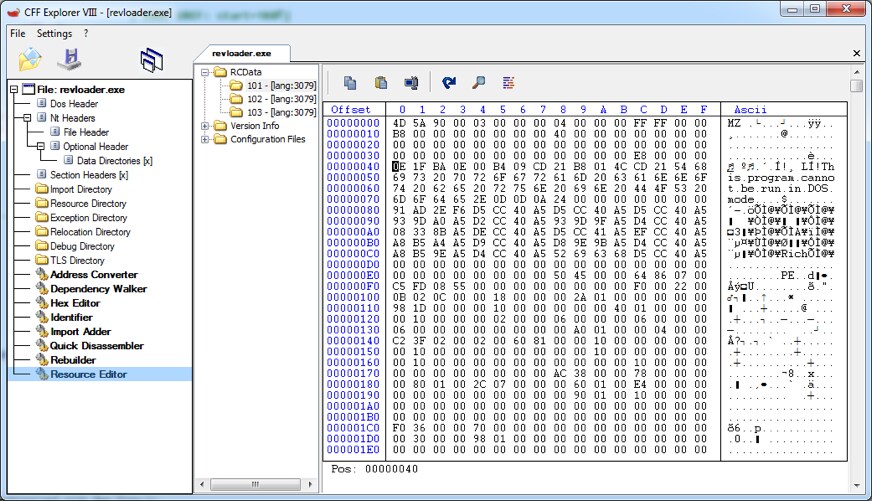
Resources of revloader.exe
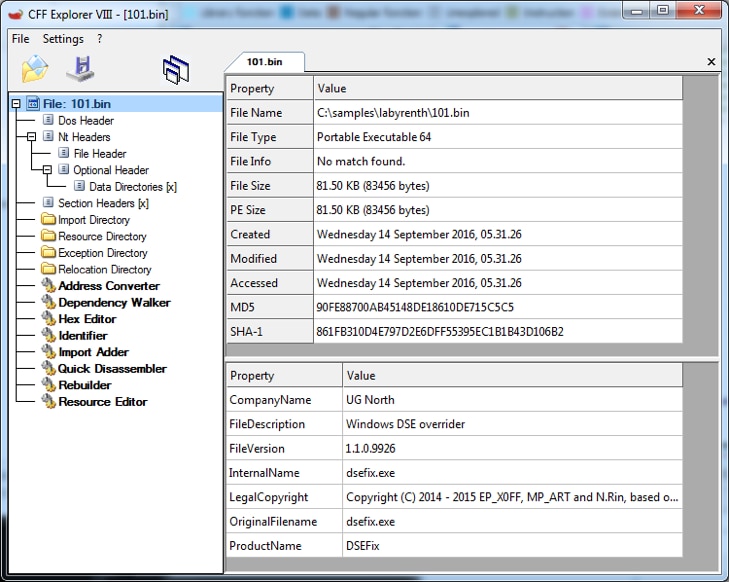
Resource 101
This file is also a PE64 and contains some version information strings, which tells us that it’s DSEFix. DSEFix is a tool that can bypass the driver signature enforcement in Windows by using an exploit in a signed VirtualBox driver. By using DSEFix, you can disable DSE and load any driver you want. So it looks like we’ll solve this challenge by using an unsigned windows driver.
Resource 102
This is the driver itself. It’s also a PE64 and uses FLTMGR.SYS. In version information, we can see that it’s a windows driver with the internal name revhunt.sys. We can also see that the file is not signed, so it makes sense that revloader.exe is going to use DSEFix to load the revhunt.sys.
Resource 103
This is an INF file for the driver. We can see that it’s a mini file filter driver and that it uses the altitude 31337.
Revloader
Let’s start with revloader.exe to verify that it’s going to drop DSEFix driver and run DSEFix to disable windows driver signature enforcement. We can take a look at the import table to find important functions that might be used for this kind of work.
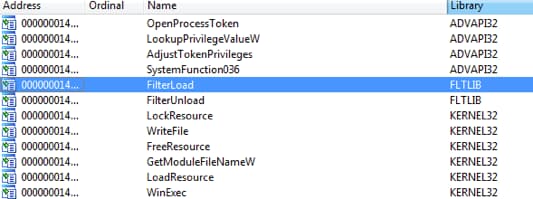
- LookupPrivilegeValueW/AdjustTokenPrivilege: to acquire the missing rights to load a driver (“SeLoadDriverPrivilege”).
- LoadResource/FindResource: to find a resource and map it to memory.
- CreateFileW: to create or access a file on the disk.
- WinExec: to execute a file.
- FilterLoad/FilterUnload: to load and unload a mini filter driver.
Following cross-references to FilterLoad we can see that the function to load the driver is at 0x140001800. That function uses InstallHinfSectionW with arguments “DefaultInstall 132 <filename.inf>” to install the driver and then uses FilterLoad to load the driver. If we follow that function back, we can see that this function has been called from main function and we can see that there are a few more interesting calls:

We can see that the function at 0x140001FD0 will be called with argument 101, 102, and 103. That means this function is probably accessing the embedded resources. If we look into that function we will see that it uses FindResourceW, SizeofResource, LoadResource, CreateFileW and WriteFile. We can rename that function to DropResource. After these three calls, it will call WinExec.
That means that revloader is dropping the resources to current directory (resource 101, 102, 103) and then executing dsefix.exe (resource 101) after it loads the mini file filter driver (resource 102 + 103).
Let’s run revloader.exe to load the driver into kernel and see if it works.
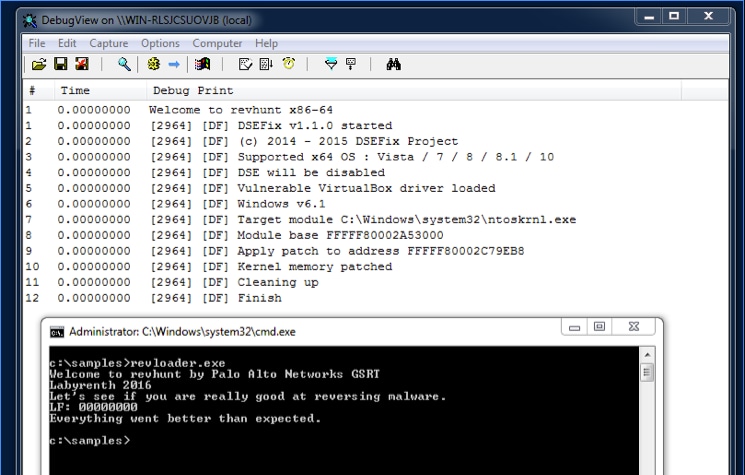
We can see the “Welcome to revhunt x86-x64”. Now let’s analyze the driver and try to find the flag.
Revhunt
Opening revhunt.sys in IDA Pro we can see that in DriverEntry function there is a jump to 0x140007000. That looks like the real main function.
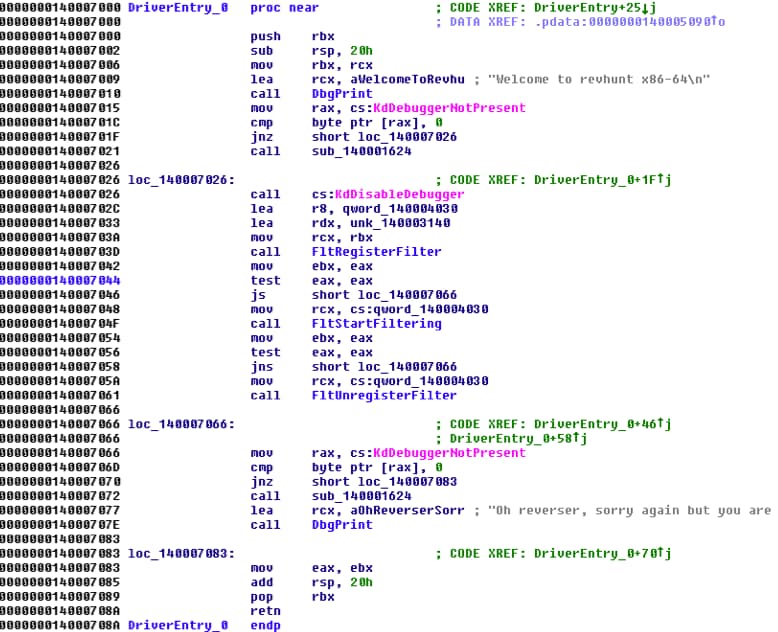
We can see that the driver is using some kernel anti-debugging functions like KdDebuggerNotPresent and KdDisableDebugger. That means if we attach a kernel debugger to our virtual machine, the function KdDisableDebugger will disconnect us. We would have to patch KdDebuggerNotPresent and KdDisableDebugger with NOP instruction or, since the driver is not signed, we can also patch the calls in the driver itself.
We can also see that the driver uses FltRegisterFilter and FltStartFiltering. Let’s take a look at definition of FltRegisterFilter:
|
1 2 3 4 5 |
NTSTATUS FltRegisterFilter( _In_ PDRIVER_OBJECT Driver, _In_ const FLT_REGISTRATION *Registration, _Out_ PFLT_FILTER *RetFilter ); |
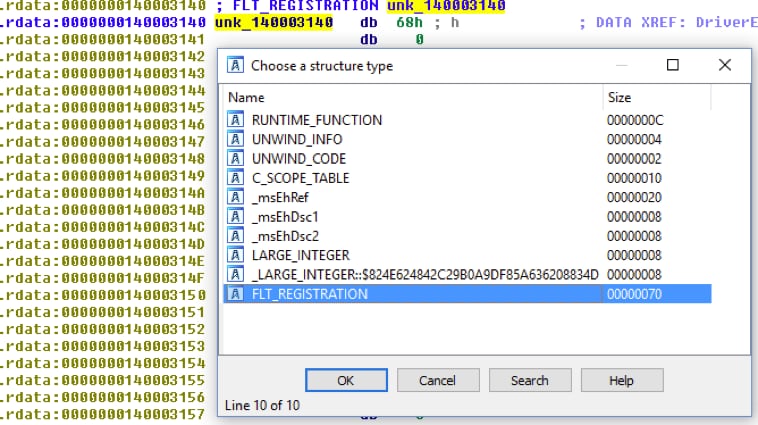
FltRegisterFilter takes a FLT_REGISTRATION structure as a second argument that contains information (flags, callback routines, etc.) for the registration of the mini file filter driver. The second argument for FltRegisterFilter in this case is:
|
1 |
lea rdx, unk_140003140 |
We can go to IDA Pro and set a structure at 0x140003140 as FLT_REGISTRATION but before we do that we have to load the correct type library: Windows Driver Kit 8 (kernel mode) - wdk8_km. You can also take any newer DDK libraries. Now we can set the correct structure:
Using that we can quickly identify what each sub-function is used for. We can also see that the flags for the structure are set to 0x02, which is FLTFL_REGISTRATION_SUPPORT_NPFS_MSFS. According to MSDN that means that the driver supports named pipes and mailslot requests as normal file events.

Now let’s do the same with OperationRegistration and set a structure of FLT_OPERATION_REGISTRATION:

Checking quickly for PreOperation and PostOperation code, we can see that the really interesting code is going on in the PostOperation function, so let’s analyze that.
PostOperation callback
Before we start, we should set a new function definition in IDA Pro to the correct definition like in MSDN, it will make our analysis a lot easier (and if you use the Hex-Rays Decompiler it will decompile a lot better). So let’s change the function definition to:
|
1 2 3 4 5 6 7 8 9 10 |
typedef FLT_POSTOP_CALLBACK_STATUS ( *PFLT_POST_OPERATION_CALLBACK)( _Inout_ PFLT_CALLBACK_DATA Data, _In_ PCFLT_RELATED_OBJECTS FltObjects, _In_opt_ PVOID CompletionContext, _In_ FLT_POST_OPERATION_FLAGS Flags ); __int64 __fastcall PostOperation(PFLT_CALLBACK_DATA CallbackData, PCFLT_RELATED_OBJECTS FltObjects, PVOID CompletionContext, FLT_POST_OPERATION_FLAGS Flags); |
By loading the correct type libraries, we can simplify the analysis because that code looks easier to read:

We can see that the function is checking if the current FileObject is a mailslot event (FO_MAILSLOT), if the current file name of the object is 18 characters long, if “\gsrt.txt”, and if the current event is opening the file. If that’s the case, then it will use FltReadFile to read from the file and compare the content with encrypted data:
So let’s quickly decode that using a python script:
|
1 2 3 4 5 6 7 8 9 10 11 |
data = [0x7F, 0x56, 0x71, 0x4E, 0x61, 0x52, 0x7D, 0x43, 0x7B, 0x19, 0x70, 0x58, 0x7E, 0x37] for x in range(0, 14): if (x % 2 == 0): data[x] ^= 0x13 else: data[x] ^= 0x37 print str (bytearray(data)) $ python decoder.py labyrenth.com |
That means, we have to create a file named “\gsrt.txt” with the content “labyrenth.com” and then open the file. After that we can see there is another byte array initialized on the stack and decode it using the same technique as before:

Let us write that to our script and decode also that string.
|
1 2 3 4 5 6 7 8 9 10 11 12 13 14 15 16 17 18 19 20 |
data = [ 0x5C, 0x5F, 0x3D, 0x19, 0x3D, 0x17, 0x7C, 0x5C, 0x72, 0x4E, 0x3D, 0x19, 0x3D, 0x19, 0x5A, 0x17, 0x7E, 0x52, 0x72, 0x59, 0x33, 0x7E, 0x43, 0x74, 0x33, 0x58, 0x7D, 0x17, 0x2D, 0x0A, 0x33, 0x60, 0x7A, 0x59, 0x77, 0x58, 0x64, 0x44, 0x33, 0x0F, 0x33, 0x40, 0x7C, 0x42, 0x7F, 0x53, 0x33, 0x5F, 0x72, 0x41, 0x76, 0x17, 0x71, 0x52, 0x76, 0x59, 0x33, 0x52, 0x72, 0x44, 0x7A, 0x52, 0x61, 0x17, 0x71, 0x42, 0x67, 0x17, 0x7E, 0x5A, 0x7E, 0x5A, 0x78, 0x56, 0x6A, 0x17, 0x6A, 0x58, 0x66, 0x17, 0x72, 0x45, 0x76, 0x17, 0x67, 0x5F, 0x76, 0x17, 0x61, 0x52, 0x65, 0x52, 0x61, 0x44, 0x76, 0x45, 0x33, 0x5F, 0x76, 0x45, 0x76, 0x19, 0x19, 0x37] for x in range(0, 104): if (x % 2 == 0): data[x] ^= 0x13 else: data[x] ^= 0x37 print str(bytearray(data)) $ python decoder.py Oh... okay....I mean IPC on >= Windows 8 would have been easier but mmmmkay you are the reverser here. |
That looks like a hint that tells us that we could have used Interprocess Communications (IPC) to do the same. If we scroll up again we will see that the sample was comparing the current FileObject.Flags with FO_MAILSLOT. That means if there was any Mailslot event it would have directly jumped to 0x140001405, which looks like an initialization function.
If we take a look into that function, we will see that it will allocate a memory address using ExAllocatePoolWithTag and save the result at 0x140004020, which I have named lpszBuffer.

If we take a look at the cross-references to lpszBuffer, we will see that it’s used in four functions: PostOperation, InitBuffer, 0x14000181C, and Unload. We will look into 0x14000181C a little later but now let’s go back to the PostOperation function and see what happens next.
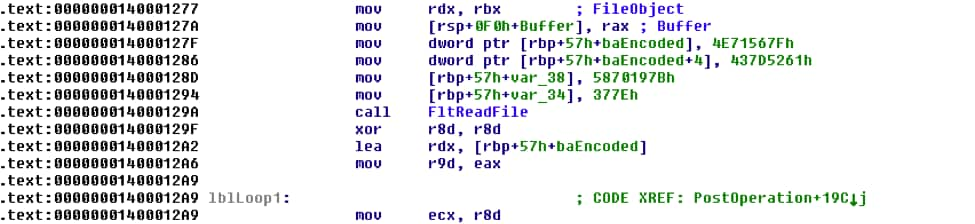
After the InitBuffer call, it will check the filename of the FileObject again and compare it with “\pan.flag”. If that’s correct, it will call the function 0x14000181C and it will print the flag using DbgPrint. That means that the decrypting routine is at 0x14000181C and that lpszBuffer will contain the decoded flag.

Now let’s take a look into the function at 0x14000181C. I have renamed that function to TestFlag.
Analyzing flag testing function
At the beginning of the function we can see that it uses FltReadFile again to read the content of the given FileObject. We can also see that it reads 58 bytes. The first four bytes are compared with “PAN{“.
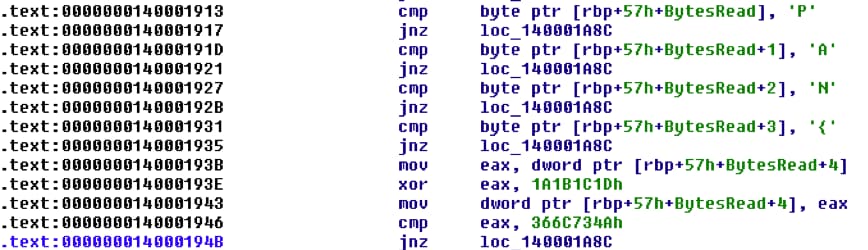
After that we can see first set of XOR data. It will take the next four bytes and XOR them with 0x1A1B1C1D and compare the result with 0x366C734A. It’s time to start writing our decoder.
|
1 2 |
key = "PAN{" key += (hex(0x366C734A ^ 0x1A1B1C1D)[2:]).decode('hex')[::-1] |
Looks good so far...
|
1 2 |
python decoder.py PAN{Wow, |
Let’s move on to the next characters. The next code segment is doing some shifting and XOR based on the result of KdDebuggerNotPresent. Function KdDebuggerNotPresent should return 1 if there is no debugger attached. We also have to reverse the order to get the correct key:

|
1 |
key += chr((0xB0 ^ 0xF0) >> 1) |
The result is a space character (0x20 in hex). We can move on to the next character but we have to reverse the order again to get the correct character (instead of add, we have to use sub, etc.):
![]()
|
1 |
key += chr((0x56 ^0x20) - 4) |
Now we just have to continue to slowly decode the whole flag but it gets trickier with a call to 0x140001AFC. At this function it will try to access characters at different offsets and do weirder calculations:

For example, at 0x140001B41 it will load the fourth character and subtract 0x20 from it and multiply it with 3 [rax+rax*2] and then it will compare it with 0xC3. Optimizer can do some pretty cool stuff sometimes.
After analyzing the whole function and its sub-functions, we get the following decoder script:
|
1 2 3 4 5 6 7 8 9 10 11 12 13 14 15 16 17 18 19 20 21 22 23 24 25 26 27 28 29 30 31 32 33 34 35 36 37 38 39 40 41 42 43 44 45 46 47 48 49 50 51 52 53 54 55 56 57 58 |
# 0x14000190A key = "PAN{" key += (hex(0x366C734A ^ 0x1A1B1C1D)[2:]).decode('hex')[::-1] key += chr((0xB0 ^ 0xF0) >> 1) key += chr((0x56 ^0x20) - 4) key += (hex((0x8888999900001110 & 0xFFFFFFFFFFFFFFF0) ^ 0x0A9FAFCEA72656775))[2:- 1].decode('hex')[::-1] # 0x140001AFC key += chr(0x20) key += chr(0x67 - 0x20) key += chr(0x72) key += chr(0xfc ^ 0x99) key += chr((0xc3 / 3) + 0x20) key += chr(0x3b ^ 0x4f) key += chr(0x20) key += chr((0x71 - 0x0f) ^ 0x0f) key += chr((0x81 ^ 0x21) - 0x31) key += chr(0x46 + 0x30) key += chr((1 ^ 0x58) + 0x0c) key += chr(0x73) # 0x140001BD4 key += chr(0x2c) key += chr(0x20) key += chr(0x1ac0 >> 6) key += chr(0x328 / 8) key += chr((0xe002 ^ 0xf2f2) / 0x30) key += chr((0x9542 ^ 0x8942) >> 6) key += chr(0x1f + 1) key += chr(0x834 * 4 / 0x50) key += chr((0x94dd ^ 0x83c1) / 0x33) key += chr(0x1f + 1) key += chr((0x1dd36c ^ 0x46) / 0x4142) key += chr(0x328250 / 0x7373) # 0x140001CD8 key += chr((0xb6 ^ 0x32) / 3) key += chr(0x40 - 0x20) key += chr((0xd7 ^ 0x44) - 0x23) key += chr((0xb2 ^ 0x21) - 0x21) key += chr(0x1bc / 4) key += chr((0x8f25 ^ 0x8875) >> 4) key += chr(((0x0d6 ^ 0x0e4) / 2) << 2) key += chr((0x62 ^ 0x42) & 0xfe) # 0x140001DB8 key += chr((0x70d49 ^ 0x48354) / 0x833) key += chr((0x14c3a1 ^ 0x232221) / 0x8c40) key += chr(0xA0 ^ 0x80) # 0x140001E2C key += chr(0x5c ^ 0x25) key += chr((0x20f63 ^ 0x23) / 0x4c0) key += chr((0x242067 ^ 0x12567) / 0x5100) key += chr(((0x61 ^ 0x21) >> 6) + 0x20) key += '}' print key python decoder.py PAN{Wow, reverser! Great moves, keep it up, proud of you!} |
Testing the flag
Now we’ll test the flag to confirm if everything is correct. We have to do following steps:
- Create a file named “gsrt.txt” with content “labyrenth.com”
- Open “gsrt.txt” to raise a FILE_OPEN event to initialize the buffer
- We can also create a mailsot event instead of these two steps (we can use CreateMailslot + WriteFile)
- Create a file named “pan.flag” with our flag “PAN{…}”
- Open “pan.flag” to raise a FILE_OPEN event to call the analyzing function
- Attach with DbgView to see the kernel debug output
The solution with creating a file is easier because we can make a batch file to do the job for us:
|
1 2 3 4 5 |
Solution.bat echo PAN{Wow, reverser! Great moves, keep it up, proud of you!} > c:\pan.flag echo labyrenth.com> c:\gsrt.txt start notepad c:\gsrt.txt start notepad c:\pan.flag |
We run revloader.exe and run our solution batch file and see what happens:
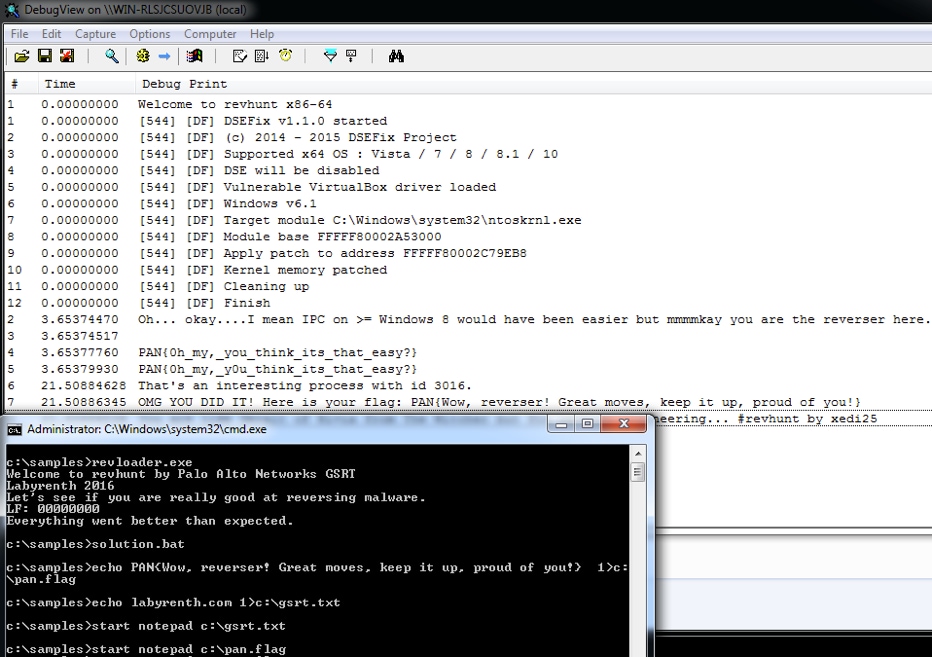
And we can see in the last screenshot that the flag is correct and it gets printed out.
Windows 9 Challenge: I think some holy dude wrote that crypter.
Challenge Created By: Esmid Idrizovic @xedi25
Initial analysis
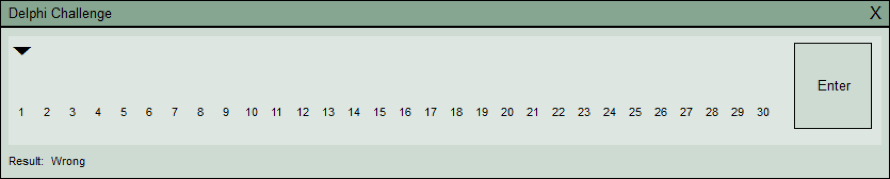
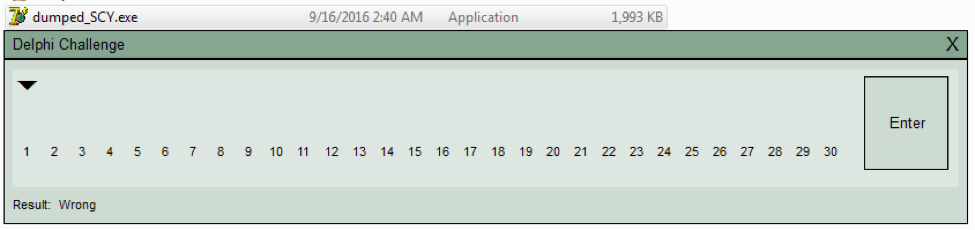
When we run the final challenge, we see a dialog where we have to enter 30 characters. We can also see that the icon is different and that it’s the default Delphi 7 executable icon. If we enter any text and press enter we see that the label changes to “Wrong”. That means that we have to enter the correct flag and press enter to verify it.
If we open that sample in a PE viewer, we see that it’s using an unknown EXE crypter to hide its code (actually that crypter is Morphine 2.7 which is also written in Delphi). We can see that by looking at the import table there are just LoadLibraryA, GetProcAddress, and the PE sections.

We can solve this challenge pretty fast if we know what we have to look for. We want to identify the routine that is checking for a valid flag. We can start our analysis at the function which sets the status to “Wrong”, but before we can do that we have to dump the executable so we can load it in IDA Pro.
Dump the executable
We can use Scylla x86 to dump the process, so let’s execute the challenge and run Scylla. Select “DelphiChallenge.exe”, press “IAT Autosearch”, after that press “Get Imports” and Scylla should be able to find the imports. You can already see the correct imports in next screenshot:
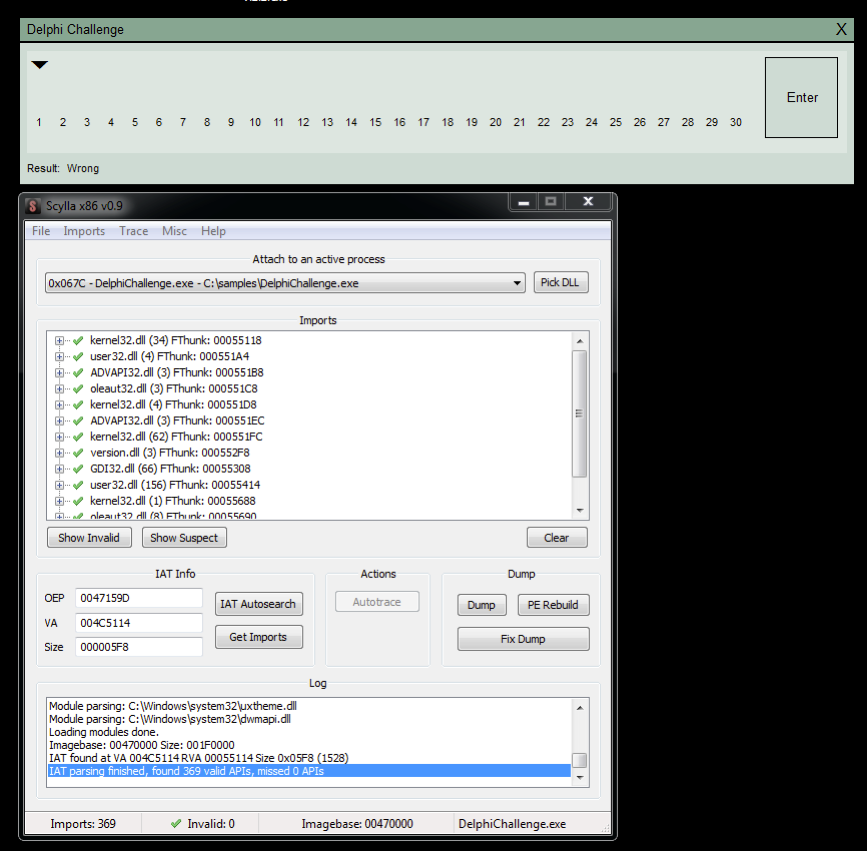
We can save the PE dump using “Dump” and “Fix dump” functions in Scylla. We can’t run that dumped file but it’s enough for a static analysis in IDA Pro. We can dump the file correctly but it takes a few extra steps (see extra part).
Static analysis
Now open the file in IDA Pro and go directly to “strings window” by using Shift+F12. Search in strings window for “Wrong” and you should see these 5 entries:
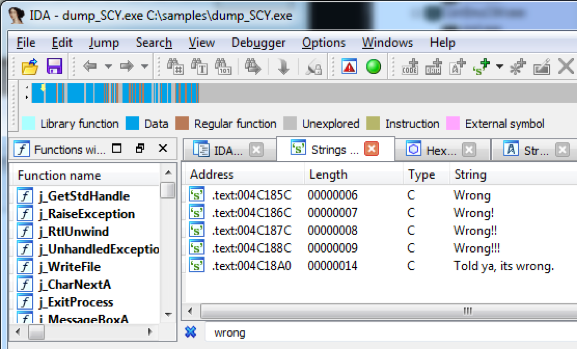
If we follow the first string using cross-references, we can see that it’s referenced in sub_4C17BC and there is one more interesting string:
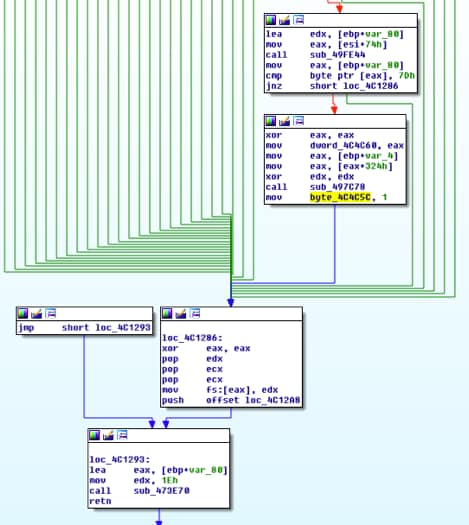
If byte_4C4C5C is nonzero then it will show “Correct!! You are so g00d”. Following byte_4C4C5C we can see that its set to 1 at offset 0x004C127F and that function starts at offset 0x004C0E1C. This function looks like our testing flag routine.
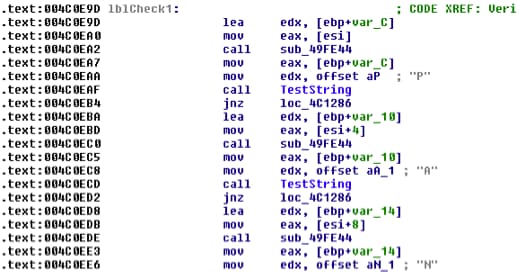
We have identified pretty quickly the routine which is checking for the correct flag, now we have to analyze that function. It’s pretty similar to Windows track challenge 8. We know that the flag must start with “PAN{“ and we can see that the function is checking for that at the beginning:
We have to follow the function and revert the calculations again like in Windows challenge 8. The final decoder script would look like this:
|
1 2 3 4 5 6 7 8 9 10 11 12 13 14 15 16 17 18 19 20 21 22 23 24 25 26 27 28 29 30 31 |
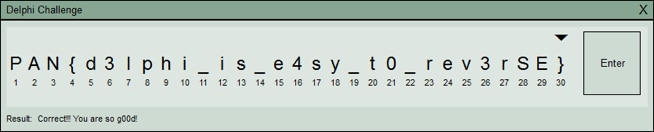
key = "PAN{" key += chr(0xcf ^ 0xab) key += chr(0x1e ^ 0x2d) key += chr(0x3e ^ 0x52) key += chr(0x52 ^ 0x22) key += chr(0x08 ^ 0x60) key += chr(0x68 + 0x01) key += chr(0xe5 ^ 0xba) key += chr(0xd7 ^ 0xbe) key += chr(0xe6 / 2) key += chr((0x2f << 1) + 1) key += chr(0x194 >> 2) key += chr((0x19 << 1) + 2) key += chr((0x1c0 ^ 0x0c) >> 2) key += chr(((0x38 ^0x04) << 1) + 1) key += chr(((0x28 + 0x07) << 1) + 1) key += chr(((0x8c / 0x0A) << 3) + 4) key += chr(0x60 / 2) key += chr(0x17c >> 2) key += chr((0x59 ^ 0x60) << 1) key += chr((0x42 ^ 0x88) / 2) key += chr((0x0c0 ^ 0x2c) / 2) key += chr((0x16 << 1) + 7) key += chr((0x36 ^ 0x29a) / 6) key += chr(((0x130f0 / 8) ^ 0x2486) / 8) key += chr(((0x2950 ^0x25a0) / 0x30)) key += chr(0x7d) print key python decoder.py PAN{d3lphi_is_e4sy_t0_rev3rSE} |
We can now test and verify if that flag is correct.
Extra: Manual unpacking
If we want do dump the process correctly we can use OllyDbg and OllyDump. To identify the original entry point (OEP) we can use the “set hardware breakpoint at current ESP” technique. For that we have to run the first instruction, go to the dump window and jump to the ESP. Then we can set a “Hardware, on access” breakpoint at current address.
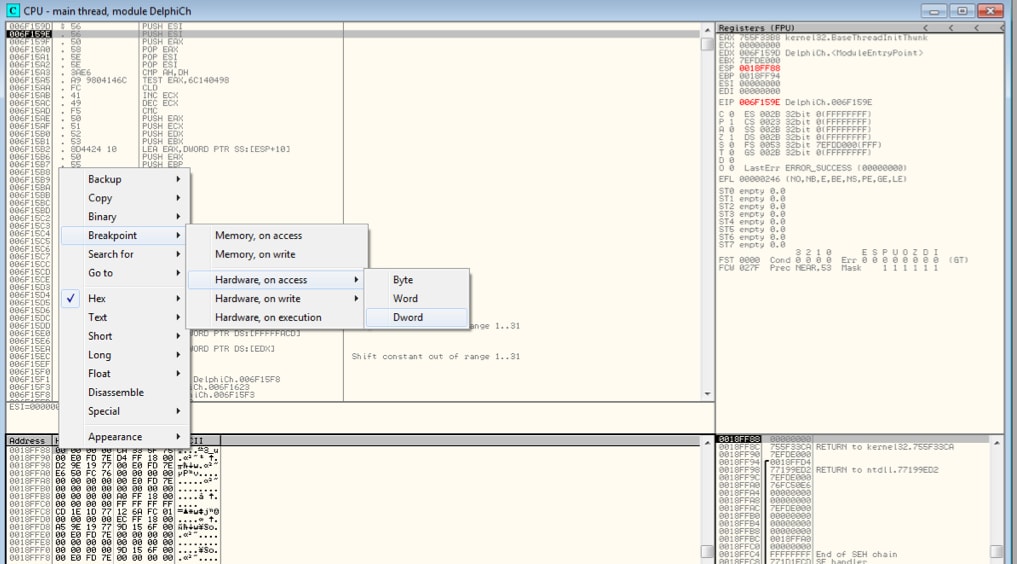
If we press F9 a few times we will reach the original entry point. Now we have to do some calculations and dump it to a new file.
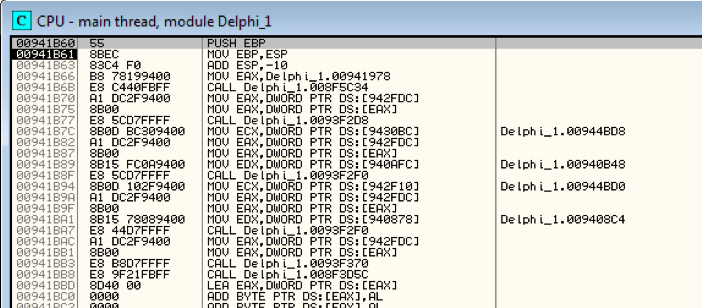
For calculating the real OEP we need to know at which address the executable has been loaded.
![]()
Now we just have to subtract these offsets and we get the correct offsets for OllyDump.
|
1 2 3 4 5 6 7 |
Calculations: OEP: 0x00941b60 Address: 0x008F0000 Size: 0x001F0000 ImageBase: 0x008F0000 New EP: (0x00941b60 - 0x008F0000) = 0x51B60 |
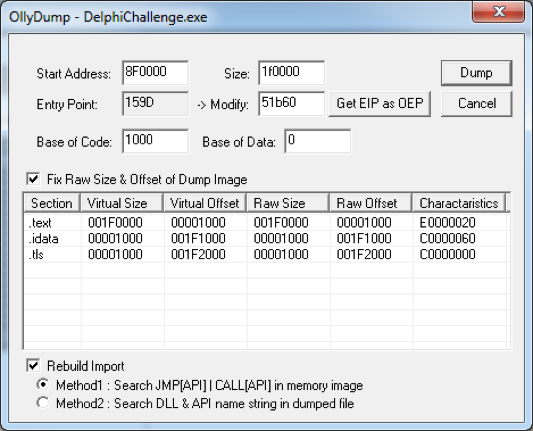
Now let’s fill that data into OllyDump and dump the file as “dumped.exe”:
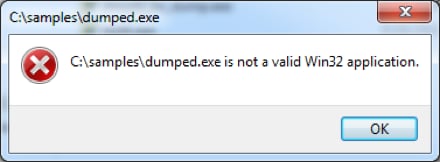
But something is still wrong if we try to execute the unpacked sample:
It’s probably the import table that causes problems, but we can use Scylla to fix that for us. For that we have to run DelphiChallenge.exe again (new process) and search for the import table. We also have to enter the correct entry point + image base:
|
1 |
EP + Imagebase: 0x51B60 + 0x8F0000 = 0x941B60 |
Now we can use “Fix dump” and fix the dumped.exe executable:
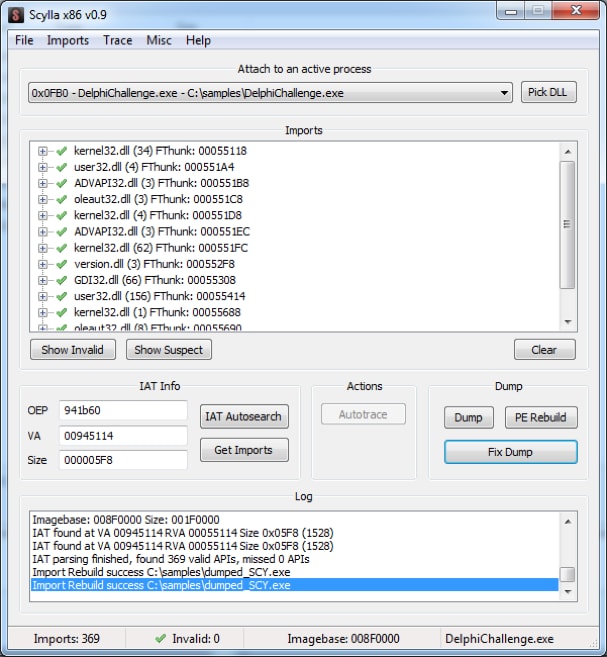
Scylla has created a new import table and now we can run the unpacked executable. Yey.
Leave a comment below to share your thoughts about these challenges. Be sure to also check out how other threat researchers solved these challenges:
Windows 7:
- https://jmprsp.wordpress.com/2016/09/08/labyrenth-ctf-windows-track-challenge-7/
- https://github.com/gray-panda/grayrepo/tree/master/2016_labyREnth/win7_pcap
- https://github.com/uafio/git/blob/master/scripts/labyREnth-2016/labyrenth-2016-win-7.py
- https://github.com/11x256/CTFs/tree/master/2016/LabyREnth/7-PCAP
- https://github.com/spartansecurity/Writeups/blob/master/labyrenth2016/windows.md#challenge-7
Windows 8:
- https://jmprsp.wordpress.com/2016/09/16/labyrenth-ctf-windows-track-challenge-8/
- https://github.com/gray-panda/grayrepo/tree/master/2016_labyREnth/win8_revhunt
- http://sibears.ru/labs/labyrenth2016-win-8/
- https://github.com/uafio/git/blob/master/scripts/labyREnth-2016/labyrenth-2016-win-8.py
- https://github.com/11x256/CTFs/tree/master/2016/LabyREnth/8-Revhunt
- https://github.com/spartansecurity/Writeups/blob/master/labyrenth2016/windows.md#challenge-8
- http://findingvulns.blogspot.sg/2016/08/labyrenth-ctf-2016-windows-track.html
Windows 9:
- https://jmprsp.wordpress.com/2016/09/19/labyrenth-ctf-windows-track-challenge-9/
- https://github.com/gray-panda/grayrepo/tree/master/2016_labyREnth/win9_delphichal
- http://sibears.ru/labs/labyrenth2016-win-9/
- https://github.com/uafio/git/blob/master/scripts/labyREnth-2016/labyrenth-2016-win-9.txt
- https://github.com/11x256/CTFs/tree/master/2016/LabyREnth/9-Delphi%20challenge
- https://github.com/spartansecurity/Writeups/blob/master/labyrenth2016/windows.md#challenge-9
Related Blogs
Our library of online content is here to help you learn more, no matter what format you prefer or which topic interests you most.
Subscribe to the Newsletter!
Sign up to receive must-read articles, Playbooks of the Week, new feature announcements, and more.
By submitting this form, you agree to our Terms of Use and acknowledge our Privacy Statement. Please look for a confirmation email from us. If you don't receive it in the next 10 minutes, please check your spam folder.